Google OAuth

Updated :

If you're looking to add a Google registration/login option to your website, please follow these steps:

1. Go to https://console.developers.google.com/apis/credentials 

2. Click on the "Select a project" drop-down, then on "New Project"

form 
Select a project 
Credentials 
Search products and resources 
o 
To view this page, select a project. 
Select a project 
Search projects and folders 
NEW PROJECT 
RECENT 
Name 
STARRED 
No organization 
CANCEL 
OPEN

3. Choose a Project name & create it:
​​New Project 
You have 12 projects remaining in your quota. Request an increase or 
delete projects. Learn more 
MANAGE QUOTAS 
Project name * 
GoogleLoginlnfo 
Project 10: focal-shape-333307. It cannot be changed later. 
Location * 
No organization 
ation or folder 
CANCEL 
EDIT 
BROWSE

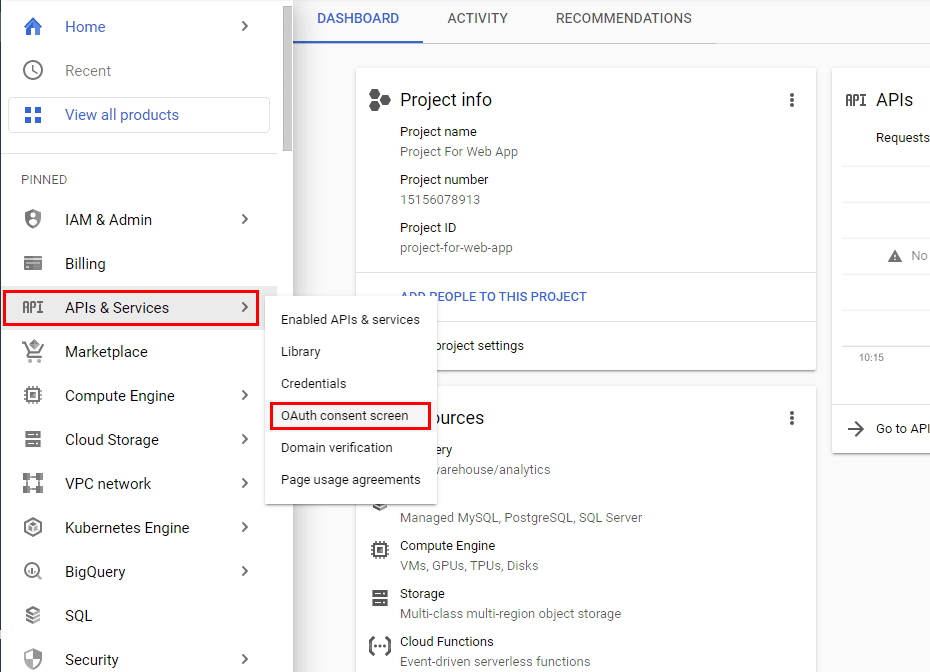
4. Select the newly created Project from the "Select a Project" drop-down, then click on the “OAuth consent screen” by hovering the mouse on "APIs & Services" from the left side menu.

Open oauth consent


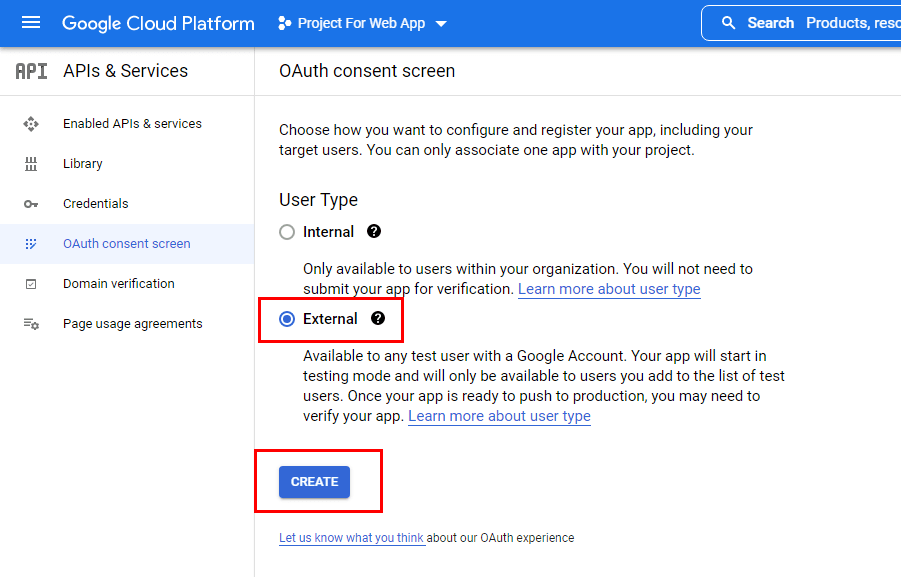
5. On the “OAuth consent screen”, Choose User Type: External and click on Create button to proceed further.

Select User Type on OAuth Consent Screen

6. Choose an "App Name" & add your email:


7. In case you've already indexed your website with Google, feel free to skip this step.

In case you haven't indexed your domain with Google yet, go to https://search.google.com/search-console/about in a new tab, click on start now and follow this guide:

https://agentlocator.zendesk.com/hc/en-us/articles/360062509331-Google-Site-Indexing 

The meta tags need to be added through the Website Editor. Once you've selected the website you'll be adding them to, you will need to go to Website Settings > Header Custom Script:


Dashboard 
Page Builder 
Blog Posts 
Exclusive Listi ngs 
Testimonials 
Agent info 
Website Settings 
Website Settings 
GENERAL SETTINGS 
Lead generation settings 
Lead Generation 
@ When enabled all visitors will be required to register to view IDX listings. When disabled IDX listings can 
ay default, forced registration is turned off for Featured Listings and Exclusive Listings. If wish to turn fo 
registration on for these listings, please enable them below: 
Featured Listings 
Exclusive Listings 
Custom script settings 
Conversion Script > 
Header Custom Script > 
Body Custom Script > 
REDIRECT RULES

Just verify the domain through Google once you've added the code and it will be sufficient (you don't need to do anything after the 2:05 min mark in the above video)


If you are adding Google registration to a subdomain, please perform step 7 for that specific subdomain & the website carrying the bare domain.

(Subdomains are domain prefixes that are separated from the main domain with a dot (.) , if you're adding this to listings.domain.com, mls.domain.com *insert-any-word-here*.domain.com you are using a subdomain & will need to perform step 7 for the Bare domain, too, ie domain.com)

Please feel free to reach out to our Support Team at support@agentlocator.ca in case you're not sure if you're using a subdomain.


And once that is done, go here:

https://www.google.com/webmasters/verification/home 

Find the domain and click on Verification Details and you will see if the domain is verified or not.


8. Under authorized domains, you will need to enter your Bare domain name:


Application terms of service link 
http.'//marinanewlgagentlocator_ca/Terms 
Provide users a link to your public terms of service 
Authorized domains 
When a domain is used on the consent scre 
n an OAuth client's configuration, it must be 
pre-registered here If your app needs t 
vough verification, please go to the Google Search 
Console to check if your domains 
uthorized_ Learn more about the authorized domain limit 
agentlocator.c 
+ ADD DOMAIN 
Developer contact information 
Email addresses 
These email addresses are for Google to notify you about any changes to your project 
SAVE AND CONTINUE 
CANCEL


For example, if you're adding the Google registration button for listings.domain.com, you will only add domain.com to the "authorized domains" field.


Then you'll add your email to the developer contact info section:


​And hit save and continue.


9. On the following screens "Scopes" and "Test Users", you will just click "save and continue" until you've completed the project creation & you see the "Back to dashboard" button on the "Summary" page.


Edit app registration 
OAuth consent screen — 
Scopes — O Test users 
Scopes express the permissions you request users to authorize for your 
app and allow your project to access specific types of private user data 
from their Google Account. Learn more 
ADD OR REMOVE SCOPES 
Your non-sensitive scopes 
Summary 
API 
No rcr.','s to display 
User-facing description 
6 Your sensitive scopes 
Sensitive scopes are scopes that request access to private user data. 
API 
No rcr.','s to display 
User-facing description 
a Your restricted scopes 
Restricted scopes are scopes that request access to highly sensitive user data. 
API 
No rcr.•vs to display 
SAVE AND CONTINUE 
User-facing description


10. After creating the project, click on “Credentials” from the left side menu to open the Credentials screen.

From here, you will go to "Create Credentials" > "OAuth client ID"


Search 
RPI 
Google Cloud Platform 
APIs & Services 
Dashboard 
Library 
Credentials 
OAuth consent screen 
Domain verification 
Page usage agreements 
Credentials 
Create credentials to aci 
API Keys 
Name 
No API keys to displa 
OAuth 2.0 Client I 
Name 
+ CREATE CREDENTIALS 
API key 
OAuth client ID 
DELETE 
Requests user consent so your app can sccess the users 
Enables server-toserver, app-level authentication using robot accounts 
Help me choose 
Asks a few questions to help you decide which type ot credential to use 
Creation date 
No OAuth clients to display

11. The OAuth client ID type will be "web application":

Create OAuth client ID 
A client ID is used to identify a single app to Google's OAuth servers. If your app runs on 
multiple platforms, each will need its own client ID. See Setting up OAuth 20 for more 
Information. Learn more about OAuth client types. 
Web application 
Chrome app 
TVs and Limited Input devices 
Desktop app 
universal Windows Platform (UWP)


12. Next, you will add this entire URL https://al-cdnendpoint-socialpages.azureedge.net to the "Authorized JavaScript origins" section:


13. You'll scroll down a bit to the "Authorized redirect URIs" section, where you will add the same URL appended with /signin-google ​

Here it is: https://al-cdnendpoint-socialpages.azureedge.net/google.html​ 

And then, click on Create.


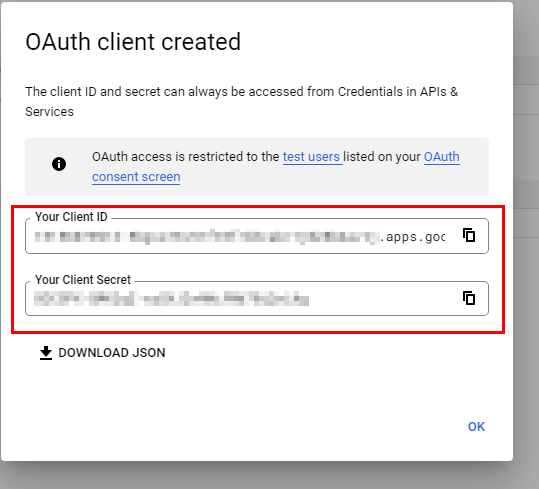
14. You will get a pop-up with your Client ID and Client Secret. Please email both to support@agentlocator.ca so our Team can install this on the website.


Google client id and client secret key


15. Note that the created ID is restricted to test users:

Creation date 
Creation date 
Nov 26, 2021 
OAuth client created 
The client ID and secret can always be accessed trom Credentials in APIs & 
O 
OAuth access is restricted to the test users listed on B)ur OAuth 
consent screen


16. Click on QAuth consent screen, located right under credentials, and click on Publish App:


OAuth consent screen 
LeadGen Website 
Publishing status O 
Testing 
PUBLISH APP 
User type 
External O 
MAKE INTERNAL 
OAuth user cap O 
EDIT APP 
Push to production? 
Your app will be available to any user with a Google Account. 
You do not need to submit your app for verification. If you change your app's 
configuration in the future, like adding more than 10 domains, uploading a 
logo, or requesting sensitive or restricted scopes, you will need to submit for 
verification. 
CANCEL 
CONFIRM 
While publishing status is set to "Testing", only test users are able to acce 
the app. Allowed user cap prior to app verification is 1 00, and is counted o 
the entire lifetime of the app. Leam more


Verification not required 
Your consent screen is being shown, but your app has not been reviewed so 
your users may not see all of your information, and you will not be able to 
request certain OAuth scopes. Learn more 
Publishing status O 
In production

It might take up to 4 days for this to be published, meaning, our Team will be able to install the IDs only once Google has completed the publication & our system can hence recognize the IDs.

Verification Status 
Verification not required 
Your consent screen is being shown, but your app has not been reviewed so 
your users may not see all of your information, and you will not be able to 
request certain OAuth scopes. Learn more

Comments

Powered by Zendesk